
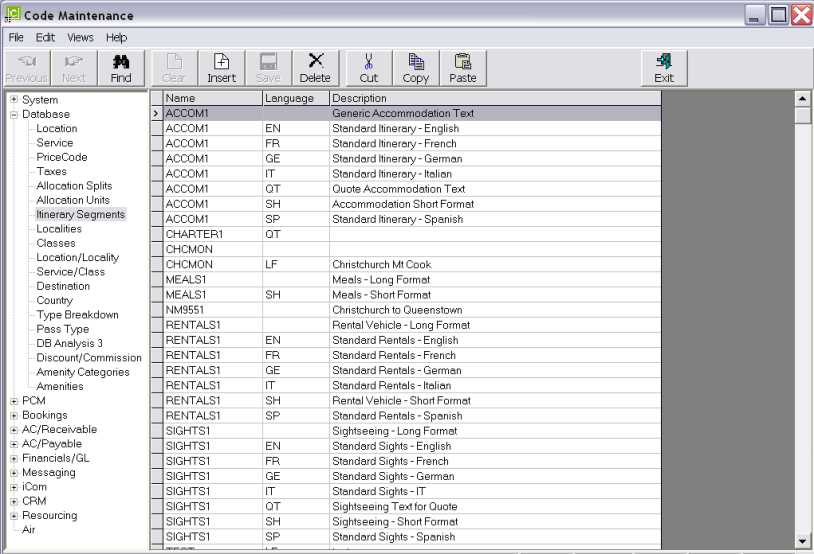
On initial entry to the Itinerary Segments node, any existing record headers will display.
(continued from Allocation Units)
Itinerary Segments are pieces of text (and graphics if required) which can be attached to services in the Product Database. When the services are used in a Quote or Booking, an Itinerary can be generated which will be made up of the Itinerary Segments attached to the services.
There is no standard method of setting up Itinerary Text—i.e., how it should be used, but there some points to consider which should be discussed with the local Tourplan Support office:
Tourplan is able to output itineraries in different languages. A Language Code attached to each Itinerary Segment identifies which segments are to be used when an itinerary is output. Although the term language implies system foreign language translation capabilities, this is not the case. Itinerary Segments can be written in different languages and a translation table can be set up in which standard system output—days of the week; months of the year etc.—can be stored in the foreign languages being used. An Itinerary Message format can be set up (with the standard text being in the foreign language) and when outputting an Itinerary, it is a case of selecting the itinerary message format of the language that is to be output, or letting the system choose, based on the language code attached to the agent. (Setting up Foreign Language Translations, Language Codes is in the System Setup Introduction section of this guide and Itinerary Message Format setup is in the Messaging Setup Section of this guide).
|
|
On initial entry to the Itinerary Segments node, any existing record headers will display. |
Screen Shot 43: Itinerary Segments Scroll
|
|
The column headings at the top of the scroll are the only column headings available in this screen. |
|
|
Itinerary Segment codes cannot be changed. Itinerary Segments cannot be deleted if they have been used in a service in the Product Database. |
To create a new Itinerary Segment, click the Insert button in the button bar.
Screen Shot 44: Itinerary Segments Entry Screen
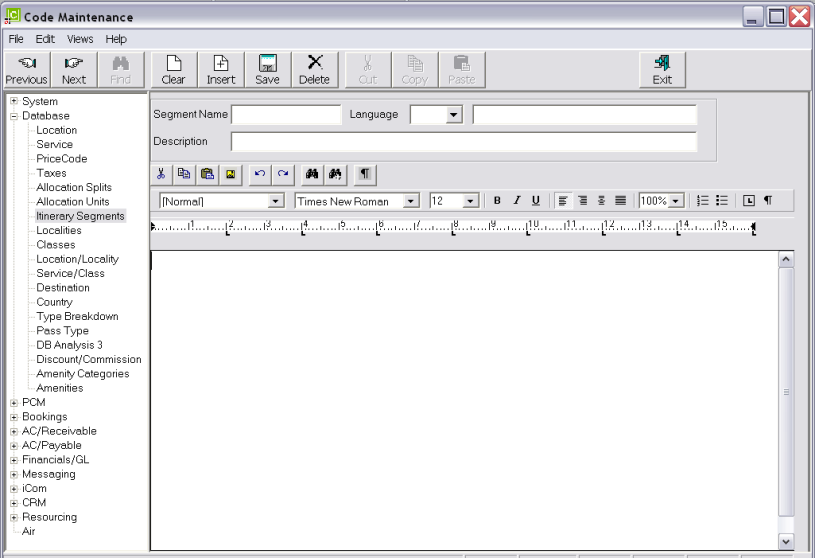
Segment Name (10 Chars)
Enter a name for the itinerary segment.
Language Code (2 Chars)
Select a previously defined language code from the drop-down.
|
|
If language codes are not being used, the blank Unassigned code must be used. |
Description (30 Chars)
An optional description of the text segment.
The remainder of the screen is basically a blank page for the itinerary segment to be written on.
The Editing screen has the following items:
|
|
Cut. (Ctrl X). Highlight the text to be cut and click this button |
|
|
Copy. (Ctrl C). Highlight the text to be copied and click this button. |
|
|
Paste. (Ctrl V). Place the cursor at the point where copied/cut text is to be placed and click this button. |
|
|
Insert File. Click to open the standard Windows Insert File dialogue. Only Word Processor files can be inserted, and are displayed in their text format. |
|
|
Undo. Undo the previous action(s). Click multiple times for multiple actions. |
|
|
Redo. Redo the previous action(s). Click multiple times for multiple actions. |
|
|
Search. Opens a dialogue box for search text to be entered. Search is on the current page only. |
|
|
Replace. Opens a dialogue box for Search and Replace text to be entered. Search and Replace is on the current page only. |
|
|
Show Codes. Turns on hidden formatting codes—Tabs, Carriage Returns etc. |
|
|
Style, Font and Font Size. The available styles and fonts are the Windows styles and fonts installed on the computer running Tourplan. |
|
|
Bold. Highlight the text to be bold faced and click this button. |
|
|
Italic. Highlight the text to be italic and click this button |
|
|
Underline. Highlight the text to underlined and click this button. |
|
|
Left Justify. Click this button to justify text on the left margin. |
|
|
Right Justify. Click this button to justify text on the right margin. |
|
|
Centre. Click this button to centre text between the left and right margins. |
|
|
JustifyClick this button to justify left and right between the margins. |
|
|
Text size on screen. This drop-down can be used to adjust the amount of text visible on screen. It does not change the font size. |
|
|
Numbering. Click this button to create a numbered list. |
|
|
Bullets. Click this button to create a bulleted list. |
|
|
The Show Codes button is replicated on the ribbon bar. |
|
|
Tabs. Click this button to set the type of tab stop required. Then position the cursor in the ruler bar where the tab stop is to be placed and click. There are 5 different types of tab stop available. To change tab stop type, click on the tab stop icon: |
|
|
Left Tab (Default). The text begins at the tab stop. |
|
|
Right Tab. The text ends at the tab stop. |
|
|
Centre Tab. The text is centred on the tab stop. |
|
|
Decimal Tab. Numeric values centre the decimal point at the tab stop. |
|
|
End of Line. Justifies text to the extreme right of the page. Cannot be moved from that position. Clears any tab stops to the right of it. |
|
|
Ruler Bar. To remove Tabs, hold the mouse pointer over the tab, hold down the left mouse button, drag the tab away from the ruler bar and drop. Tabs can be adjusted by drag and drop. When a tab is selected (by holding the mouse pointer over it and holding down the left mouse button), the current position of the tab stop will display at the left hand end of the ruler bar, and this value will change as the tab is dragged.
|
|
|
If using indented text or tabs, ensure that all itinerary segments defined use the same indent/tab settings. |
|
|
If graphics (e.g. photographs of hotels) are to be used, these should not be pasted here, but in a specific note category attached to either the supplier (if the photograph is of the property) or attached to the specific product in the Product Database (if the photograph is of specific rooms). |
The following are examples of multi-language generic Accommodation service type itinerary text.
|
|
Note that these are five separate itinerary segments with the same code (ACCOM) but each with a different language code. Rather than paste 5 separate screen dumps into this document, the contents of the 5 segments have been copied/pasted below. |
Example 1: Multi Language Itinerary Segments
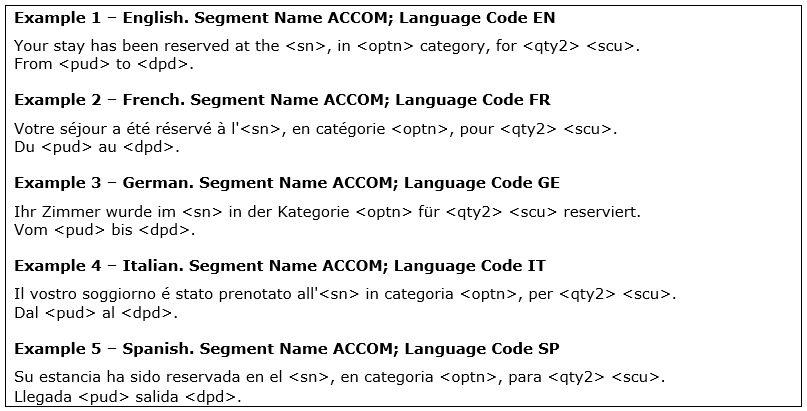
When the itinerary is output, the following text will be substituted for the following codes in the text segments:
|
<sn> |
Supplier Name |
|
<optn> |
Product Description/Service Option Name |
|
<qty2> |
Quantity of second charge units. |
|
<scu> |
Second Charge Unit Description. |
|
<pud> |
Pick-up/In Date |
|
<dpd> |
Drop Off/Out Date |
Two examples of the output using an English and German Itinerary message are below.
Example 2: Itinerary Segment Output

The text which has been substituted is in bold type.
|
|
Note that in the English itinerary, the substitution for the second charge unit is Night and in the German itinerary is Nacht. This is possible by using the language translation facility which is covered in the CodeMaint Messaging Setup node section. |
Data in Examples 1 and 2 are reproduced with the kind permission of Tahiti Nui Travel SARL, Papeete, French Polynesia.
Once completed, Itinerary Segments are attached to services in the Product Database. This procedure is detailed in the Database and Allocations Training Guide.
Screen Shot 45: Example Completed Itinerary Segment
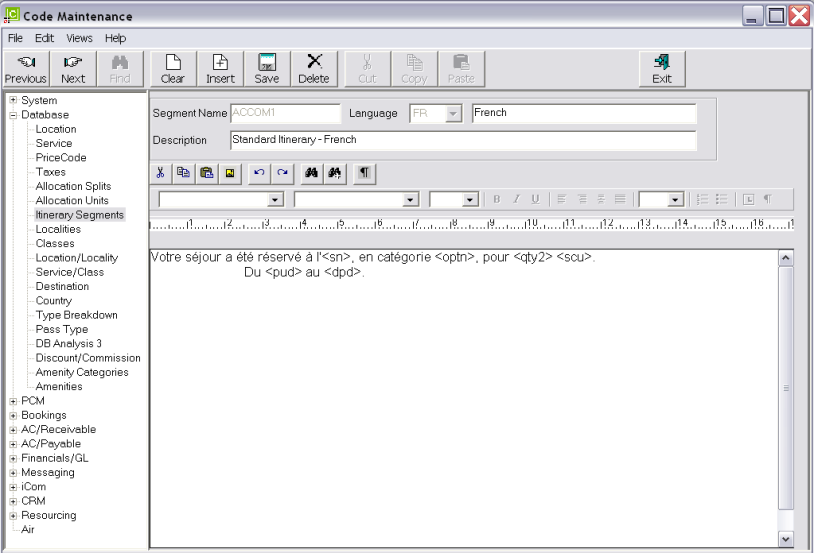
Save
Click the Save button in the button bar to save the Itinerary segment.
Clear
Click the Clear button in the button bar to cancel setting up the Itinerary segment.
 Tourplan iS V2.07 System Setup Training Guide


